


Unable to connect my computer to the Wi-Fi
| Unable to connect my computer to the Wi-Fi |
There may be various reasons why this issue occurred. The Wi-Fi connection is prone to being affected by the environment which subsequently has a negative impact on the user experience. If you cannot connect your computer to the network, troubleshoot this issue by performing the following steps.
Cause and solution
Scenario 1: The network icon  is displayed normally
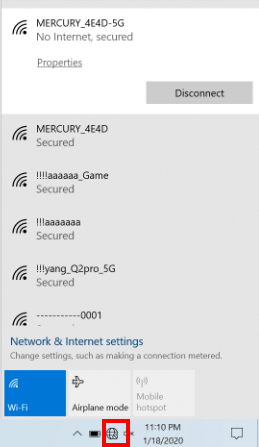
FAQ 1: The computer cannot scan for the hotspot
Cause: This is because there are some discrepencies between the refresh intervals of the operating system, bottom-layer drivers, and the wireless hotspot, resulting in it taking more time for the computer to scan for the hotspot.
Solution: Perform the following to troubleshoot:
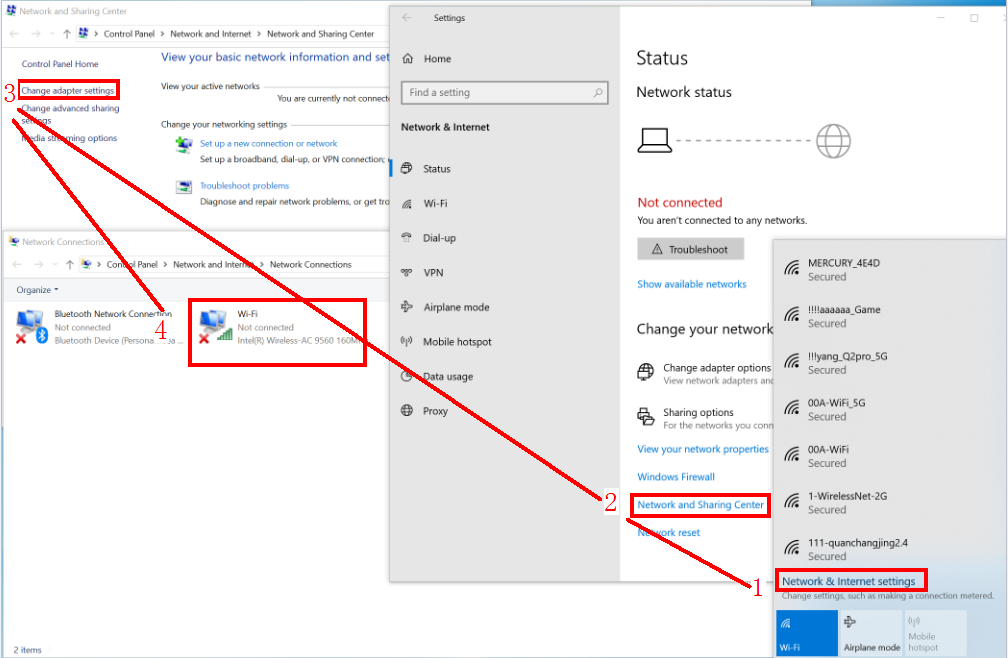
Click the Wi-Fi icon and then go to Network & Internet settings > Network and Sharing Center > Change adapter settings, right-click Wi-Fi and Disable, then click Enable.

FAQ 2: My computer cannot connect to the hotspot or is unable to connect to the network, and it frequently disconnects from the Internet once connected.
Cause: This may happen because you have already connected to this Wi-Fi network or hotspot before, but the old password stored on the computer is different from that of the hotspot.
Solution:
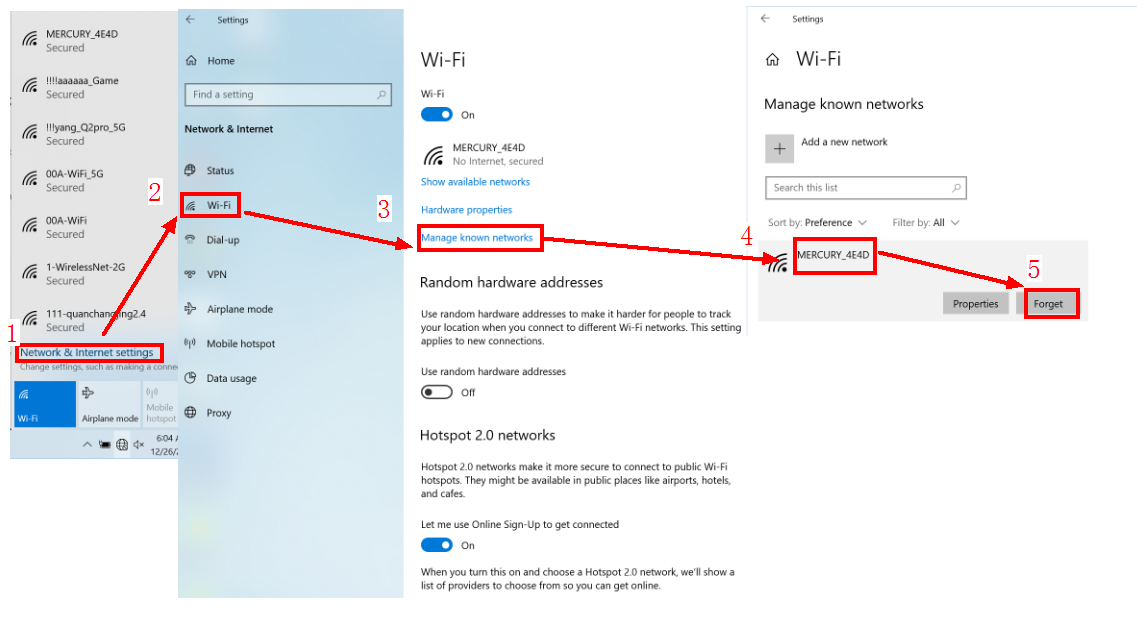
(1) Click the Wi-Fi icon in the bottom-right corner, go to Network & Internet settings > Wi-Fi > Manage known networks, then select the hotspot and click Forget.
Note: To check whether you have entered the correct password, forget the password on your phone or other device that is connected to the Wi-Fi, and enter the password again to see if you have entered the correct password.
(2) If you are sure that you have entered the correct password, but your computer still frequently disconnects from the hotspot when in use, check whether other devices are connected to the hotspot properly. If this is the case, this issue may be occurring because you are using an old router. To resolve this issue, perform step 3 to configure the router. If this issue persists, use another router or use a wired connection.
(3) Set MIMO Power Save Mode to No SMPS. Please note that this is only applicable to computer models with the Intel chipset.
Click the Wi-Fi icon and then go to Network & Internet settings > Network and Sharing Center > Change adapter settings.
Right-click Wi-Fi, click Properties, and click Configure....

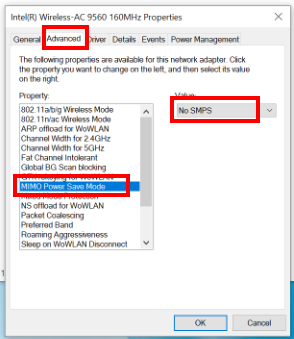
Click Advanced, click MIMO Power Save Mode, select No SMPS under Value, then click OK.
(4) Set Power Saving Mode to Maximum Power Saving.
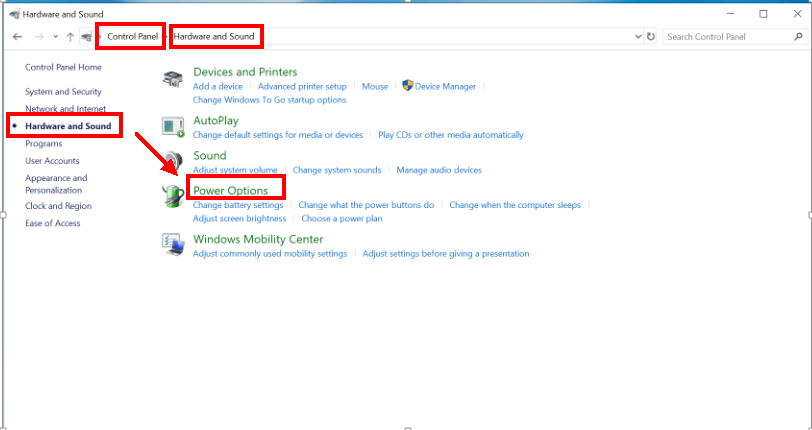
Open Control Panel and go to Hardware and Sound > Power Options.
Click Change plan settings.
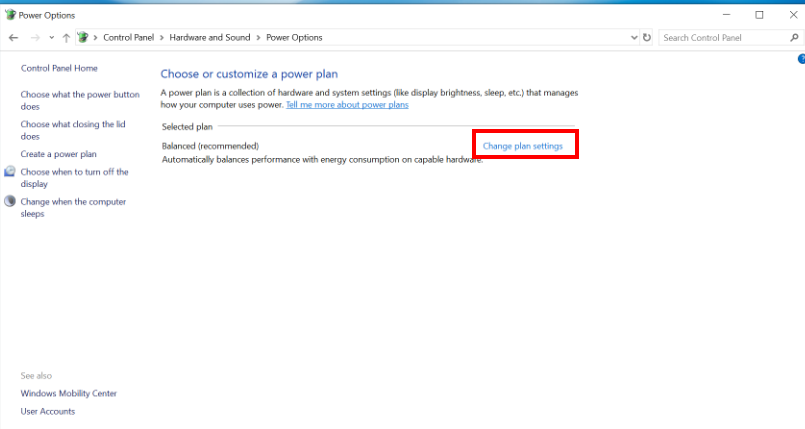
Select Change advanced power settings.
Click + next to Wireless Adapter Settings and set On battery and Plugged in under Power Saving Mode to Maximum Performance.

FAQ 3: After the computer is connected to the hotspot, the Wi-Fi icon is displayed as connected, but the computer cannot obtain a network connection.
Cause: This may be because the system file has been modified. To resolve this, reset the network specifications.
Solution: Set MIMO Power Save Mode to No SMPS and set Wireless Adapter Settings to Maximum Power Saving.
To reset the network, click the Windows icon, click the Settings icon, go to Network & Internet > Status, and select Network reset.
![]()
Alternatively, you can reset the network by using the netsh winsock reset command.
(1) Search for cmd in the search box on the taskbar.
(2) Run cmd.exe as an administrator and run the netsh winsock reset command. Then restart your computer.

Perform the following steps to modify the configuration on your computer:
(3) Perform the following steps to set MIMO Power Save Mode to No SMPS.
Click the Wi-Fi icon and then go to Network & Internet settings > Network and Sharing Center > Change adapter settings.

Right-click Wi-Fi, select Properties, and click Configure....
Click Advanced, select MIMO Power Save Mode, set Value to No SMPS, and click OK.

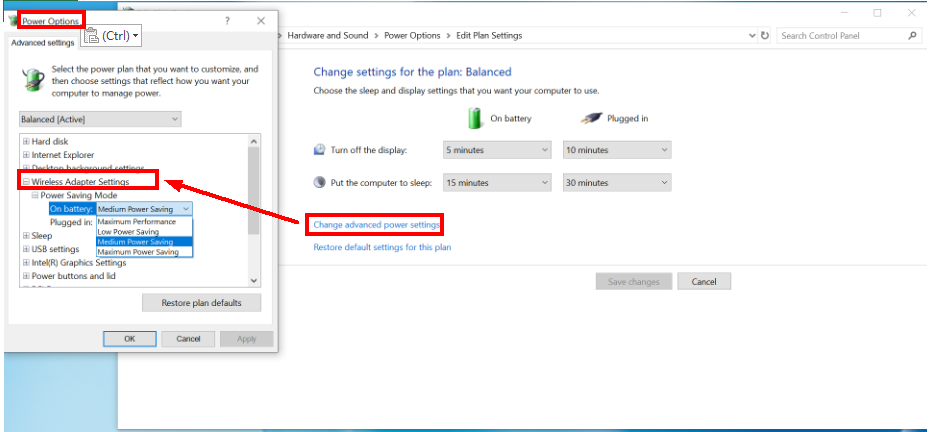
(4) Set Power Saving Mode to Maximum Power Saving.
Open Control Panel and go to Hardware and Sound> Power Options.

Click Change plan settings.

Select Change advanced power settings.

Expand Wireless Adapter Settings, expand Power Saving Mode, and set On battery and Plugged in to Maximum Performance.

FAQ 4: Unable to visit a certain server or webpage, or it takes a long time for the webpage to load
Cause: After the computer is connected to the hotspot, the computer will obtain a DNS and IP address that are allocated and distributed by the router. If the allocation is incorrect, the computer will not be able to connect to the network or visit a webpage. If you cannot visit a certain webpage, this issue may occur due to some proxy servers or a browser firewall.
Solution:
(1) Run cmd.exe as an administrator and run the ipconfig /all command to check the network adapter information for the current network.
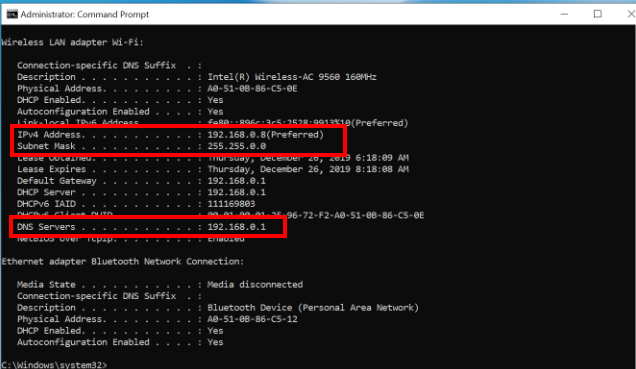
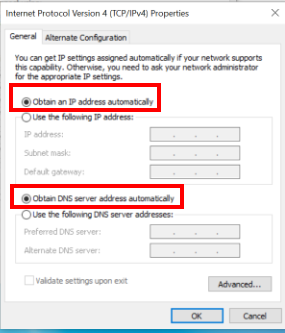
(2) Check that the DHCP has been enabled. If not, it indicates that you have not set the IP address and DNS settings to obtain the address automatically. To resove this issue, enable Obtain an IP address automatically.
To change the IP address, perform the following:
If DHCP Address is displayed as Yes, check whether the IP address and the DNS server address are listed. If not, disconnect the Internet connection or disable Wi-Fi then obtain the IP address again. If the issue still persists, restart the router and try again. If the issue still cannot be resolved, modify the IP address to the fixed one. Ensure that the IP address has the same network segment as the hotspot. For example, if the LAN network segment is "192.168.1.1" (to obtain the network segment, check the IP address of other devices), then set the IP address to "192.168.1.XX" (XX is any number between "0" and "255"). You do not need to configure the DNS.
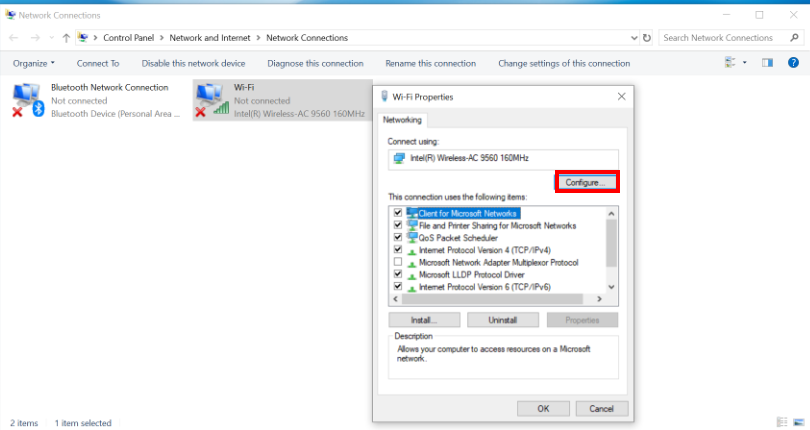
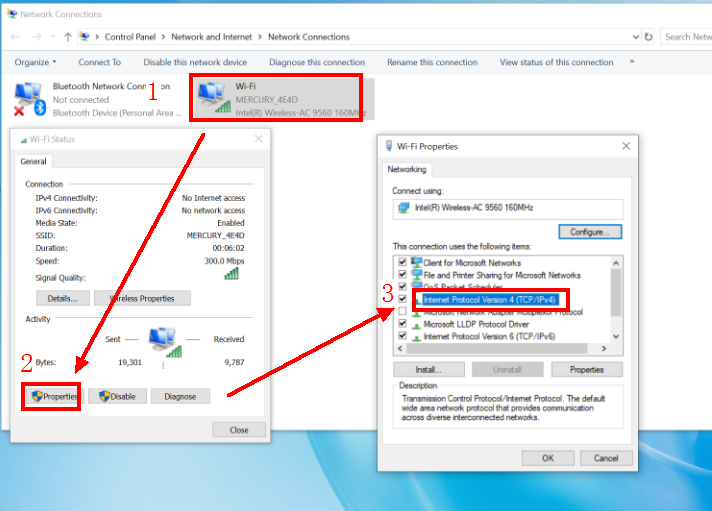
Click the Wi-Fi icon and then go to Network & Internet settings > Network and Sharing Center > Change adapter settings. Right-click Wi-Fi, select Properties, click Internet Protocol Version 4 (TCP/IPv4), and select Obtain an IP address automatically and Obtain DNS server address automatically.

(3) If the DNS and IP address are displayed properly, perform the following steps to modify the network and Internet configuration.
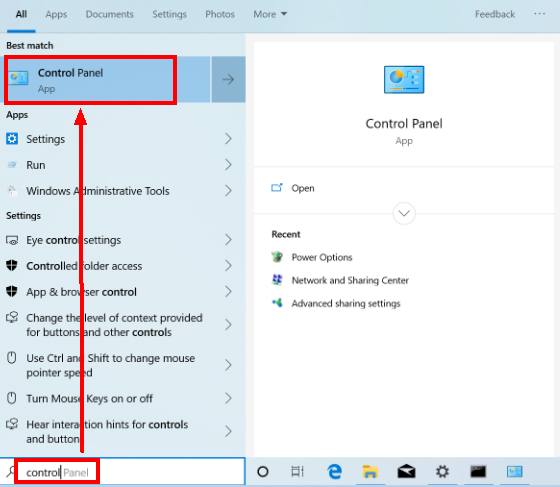
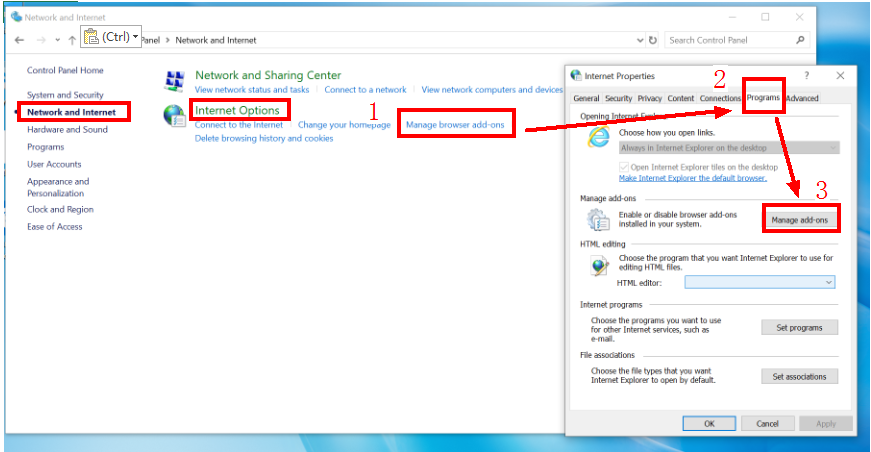
Enter Control Panel in the search box on the taskbar and open Control Panel.
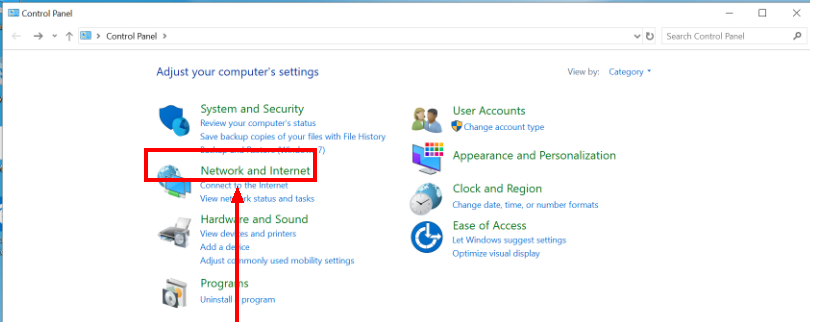
Select Network and Internet.
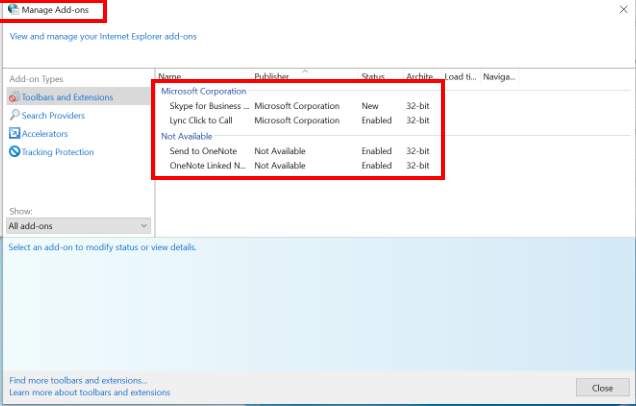
Go to Manage browser add-ons > Programs > Manage add-ons, click Toolbars and Extensions, and check whether there are any abnormal add-ons.
Click Advanced to reset and reconfigure the Internet properties.
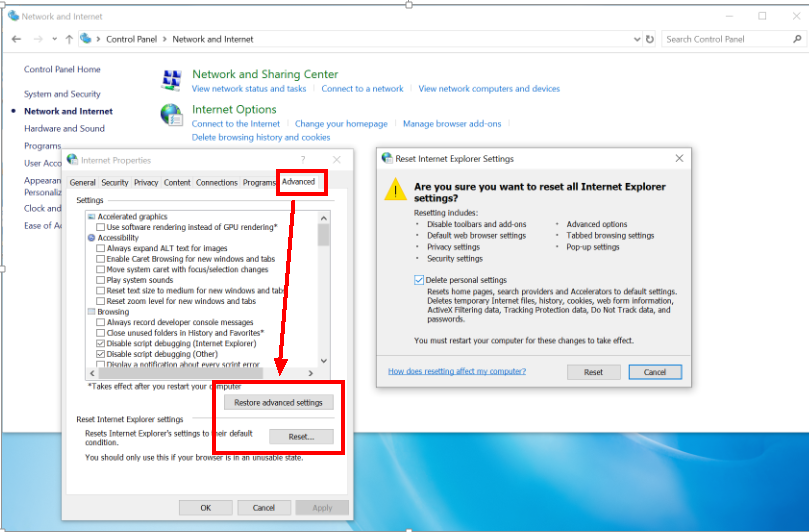

Reset and restart the browser.
FAQ 9: Unable to use the network after enabling a VPN.
Problem: After the user enables a VPN on the computer and switches to another server or exits the VPN, they find that although it is displayed that the computer is connected to the Internet they cannot use the Internet or open webpages.
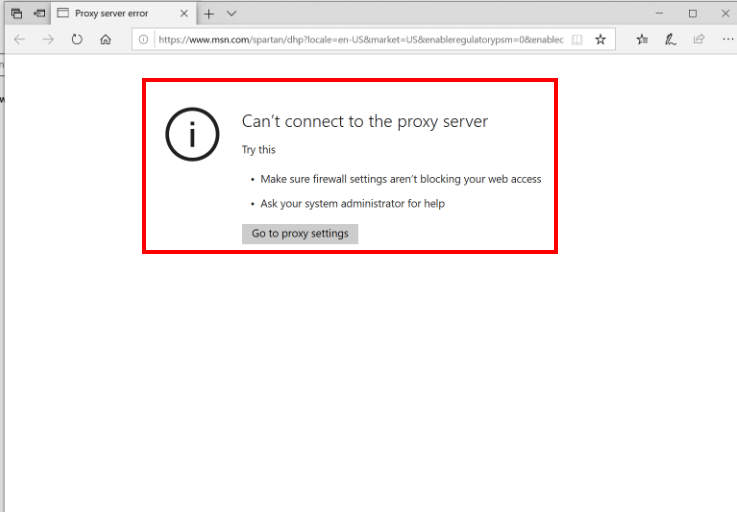
Cause: The VPN server, software or network control sets the proxy server on its own and modifies the browser's proxy configuration.
Solution: Perform the following to resove this issue.
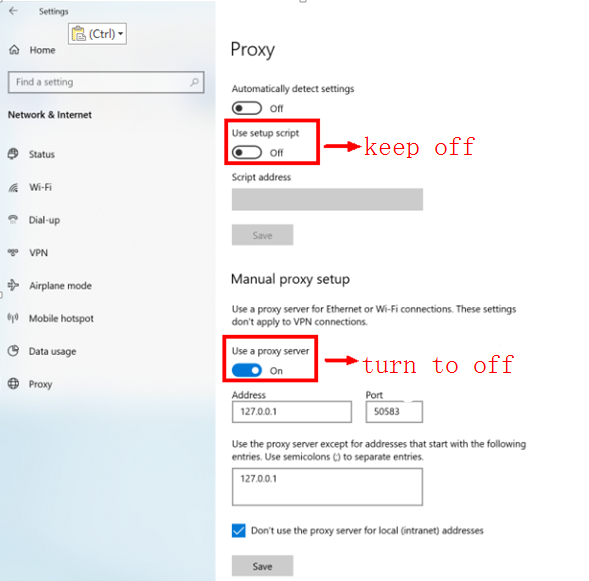
Right-click the Windows icon, go to System > Network & Internet, disable Use setup script, and enable Use a proxy server.
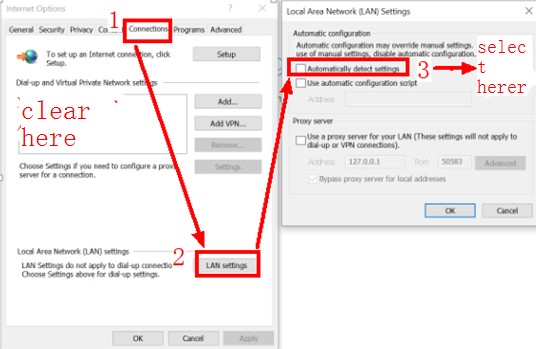
Open Internet Explorer, click the Settings icon, click Internet Options, click Connections, and remove all settings under Dial-up and Virtual Private Network settings.
Open Control Panel, go to System and Security > Action Center > Change User Account Control Settings, and select Never notify.
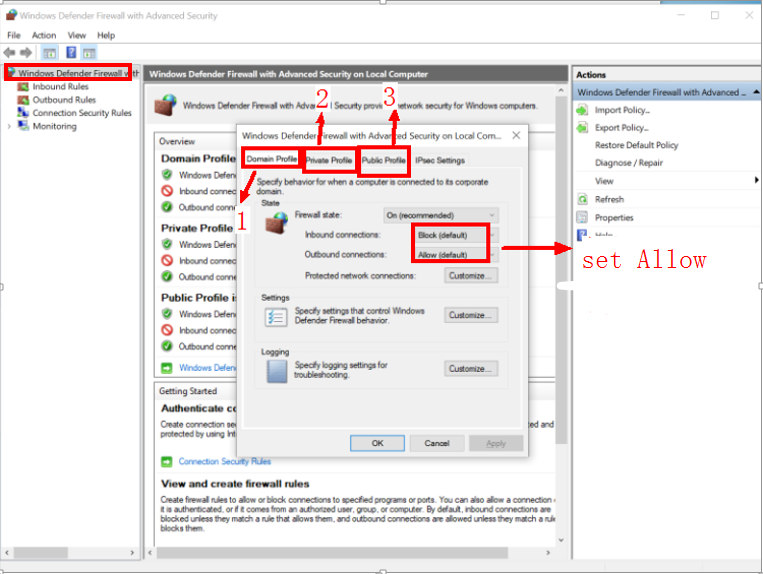
Open Control Panel, go to System and Security > Windows Defender Firewall > Windows Defender Firewall with Advanced Security on Local Computer > Properties and set Firewall state under Domain Profile, Private Profile and Public Profile to Off.
If this issue still persists, contact the VPN provider for assistance.
Scenario 2: The "*" icon is displayed on the Wi-Fi icon.
FAQ 5: There is a "*" icon displayed on the Wi-Fi icon and the computer is unable to connect to the hotspot.
Problem: The user finds that there is a "*" icon on the Wi-Fi icon, indicating that the computer cannot connect to the Internet.
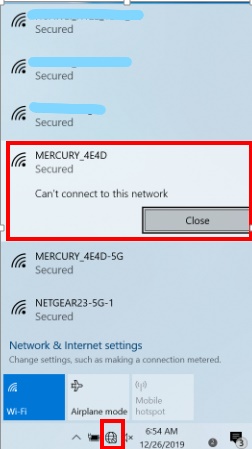
Solution: Check that you have entered the correct password and correctly configured your computer. If you still cannot connect your computer to the network, press and hold the power button for 15 seconds to shut down and restart your computer, and try connecting the computer to the Wi-Fi again.
If you still cannot connect your computer to the Internet, try connecting the computer to another hotspot or other router and check whether the computer can connect to the network. If this is successful, it indicates that you are using an old router and it is recommended that you replace the router or use a wired connection.
Scenario 3: A red "X" icon is displayed on the Wi-Fi icon.
FAQ 6: A red "X" icon is displayed on the Wi-Fi icon.
Cause: This may be because Wi-Fi is disabled on your computer, the driver is faulty, or the registry list has been modified or deleted by some software.
Solution: Perform the following to troubleshoot:
(1) If this issue is automatically resolved after a period of time, it indicates that it is an issue caused by Microsoft's system design.
It also indicates that the number of connected devices for this hotspot has reached the maximum amount. To resolve this, disconnect other connected devices or connect your computer to another hotspot.
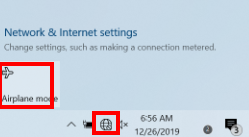
(2) To check if this issue is caused due to the Wi-Fi function being disabled, click the Wi-Fi icon on the desktop and then click Network & Internet settings > Wi-Fi.
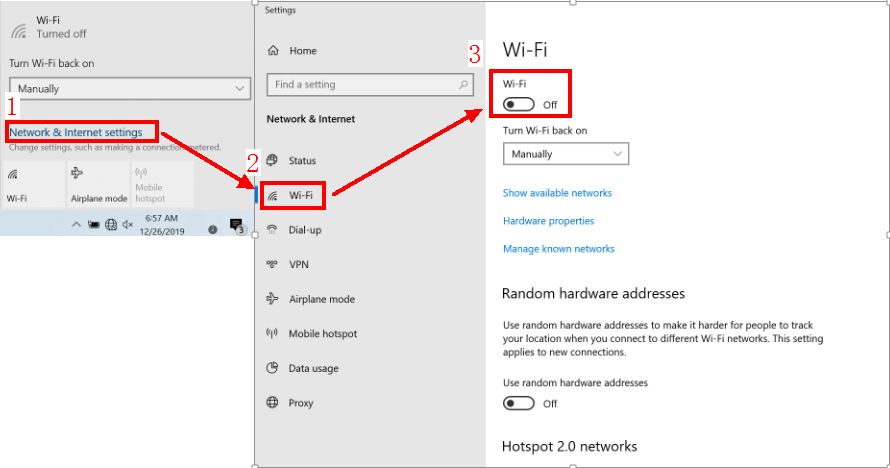
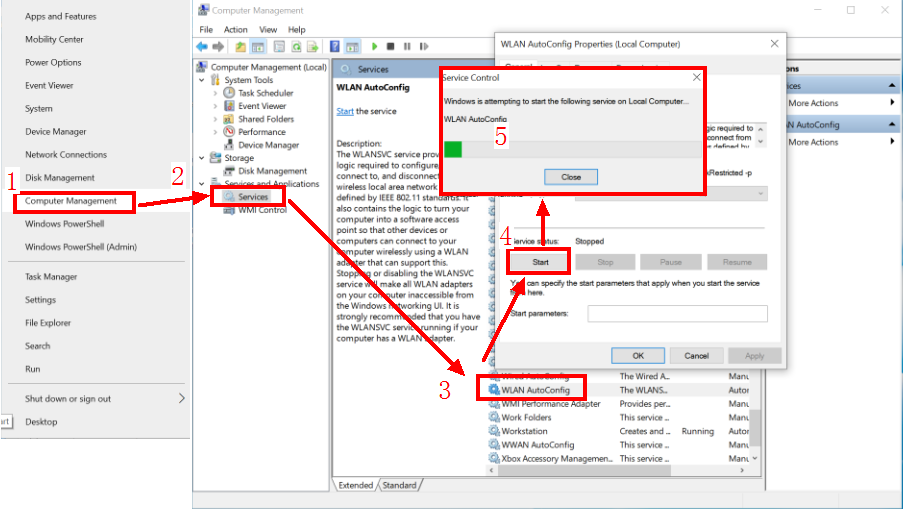
(3) Check whether the WLAN AutoConfig service is running properly. Perform the following steps to enable this service.
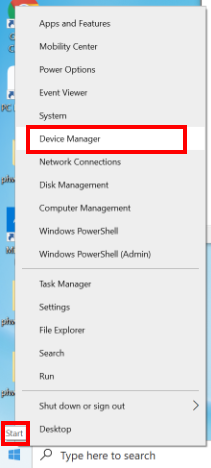
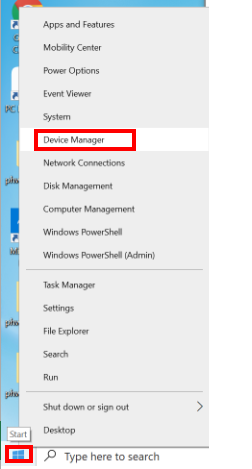
Right-click the Windows icon and then go to Computer Management > Services and Applications > Services > WLAN AutoConfig to check whether WLAN AutoConfig is running.
If WLAN AutoConfig is not running, right-click it and select Start.
If WLAN AutoConfig can run properly, check whether there is a yellow exclamation mark displayed on the network adapter.
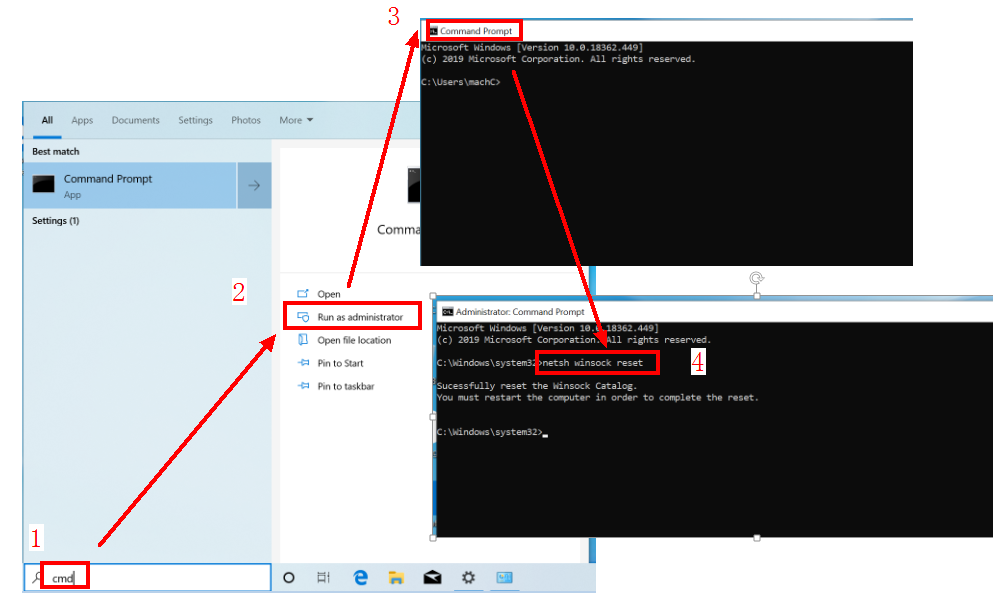
If WLAN AutoConfig cannot start at all, run the netsh winsock reset command to reset the network.
Enter cmd in the search box on the taskbar, run cmd.exe as an administrator, run the netsh winsock reset command, and restart the computer.
(4) Check whether the Wi-Fi driver on your computer is faulty. To do this, perform the following steps.
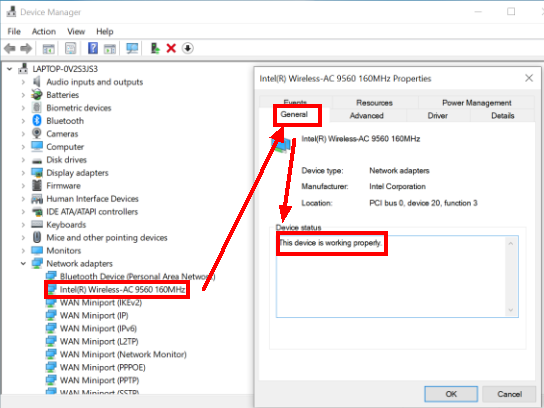
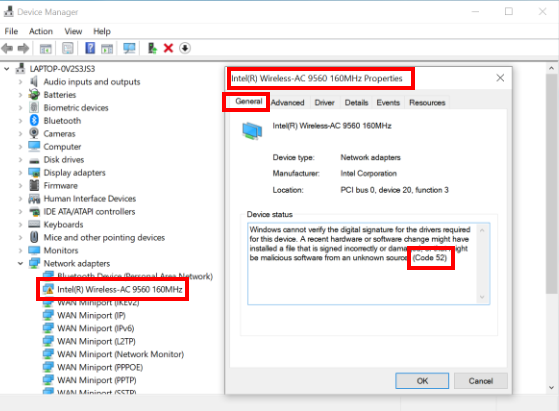
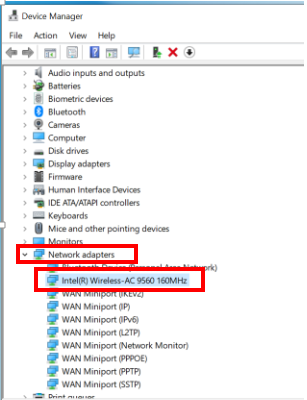
On your computer, go to Device Manager > Network adapters, double-click Intel(R) Wireless-AC 9560 160MHz, click General, and check whether This device is working properly is displayed under Device status.
If so, unplug the power supply from the computer, press and hold the power button for 15 seconds to shut down the computer, and restart the computer.
Enter cmd in the search box on the taskbar, run cmd.exe as an administrator, run the netsh winsock reset command, restart your computer, then disable and enable the Wi-Fi again.

If you cannot disable or enable the Wi-Fi, press and hold F10 to restore your computer to its factory settings.
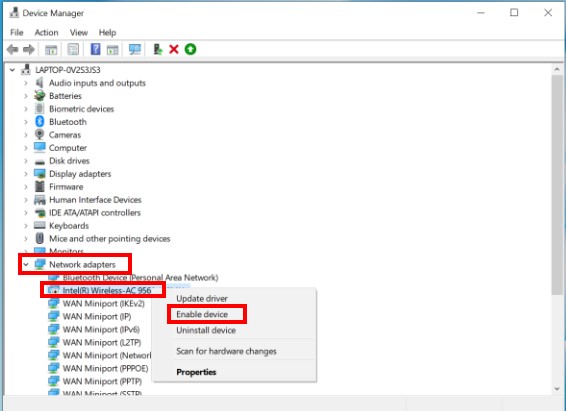
If you cannot find the Network adapters on your computer or there is an error code displayed as "10", perform the following to troubleshoot.
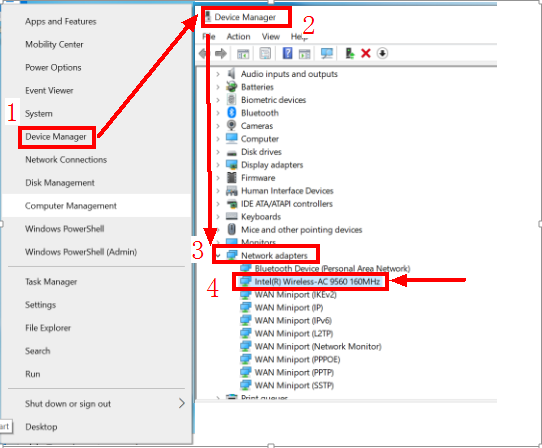
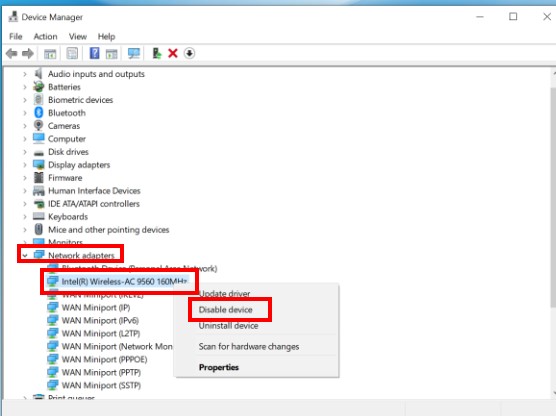
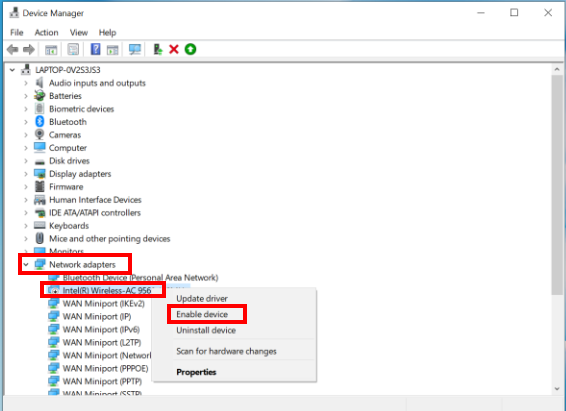
Restart your computer, right-click the Windows icon, go to Device Manager > Network adapters, right-click Intel(R) Wireless-AC 9560 and then select Disable device. Then right-click Intel(R) Wireless-AC 9560 again and select Enable device.

If the issue persists, unplug the charger from the computer, press and hold the power button for 15 seconds to shut down the computer, then restart the computer again. Disable and then enable the Wi-Fi again. If the issue still cannot be resolved, back up important data, then press and hold F10 to restore your computer to its factory settings. If the red "X" icon is still displayed after the system is reset, bring your device and proof of purchase to an authorized Honor Customer Service Center for assistance.

Restoring your system to the factory settings will clear all your data in the C drive. Back up any important data before you proceed.
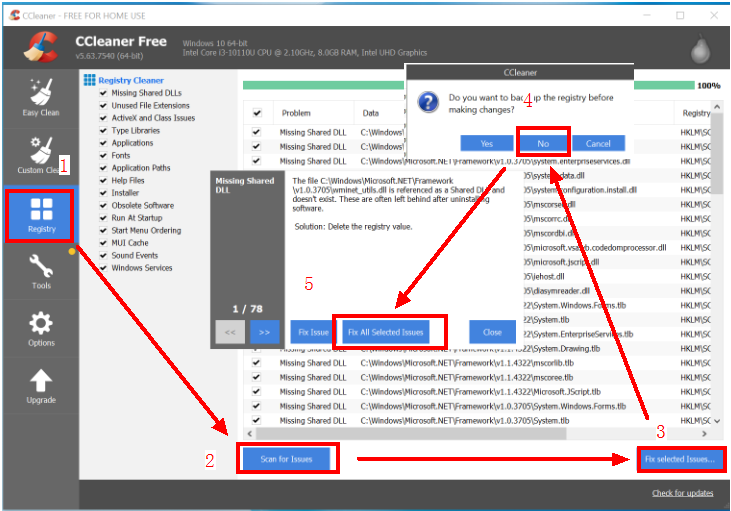
If the error code is "56" or other error codes are displayed, it indicates that the registry list is faulty because you have installed VM or other software. As a result, your computer is unable to identify the error caused by the driver.
To resolve this issue, download CCleaner. You can also use antivirus software to clear the registry list and check whether this resolves the issue. If this issue persists, uninstall CCleaner and download it again. Visit the official website of CCleaner (https://www.ccleaner.com/ccleaner) and download CCleaner. Then open CCleaner, go to Registry > Scan for issues > Fix selected Issues... > No > Fix All Selected Issues, and restart your computer.
If the issue still cannot be resolved, back up important data then press and hold F10 to restore your computer to its factory settings.
If the error code is "52", this issue may have occurred because you have installed an unauthorized non-Honor driver, which means that the computer is unable to identify the driver. To resolve this issue, uninstall the authorized driver and install a driver that has been authorized by Honor.
Perform the following to troubleshoot:
(1) Uninstall the current driver.
Open Device Manager, find Network adapters, right-click Intel(R) Wireless-AC 9560 160 MHz, click Uninstall, and restart your computer.

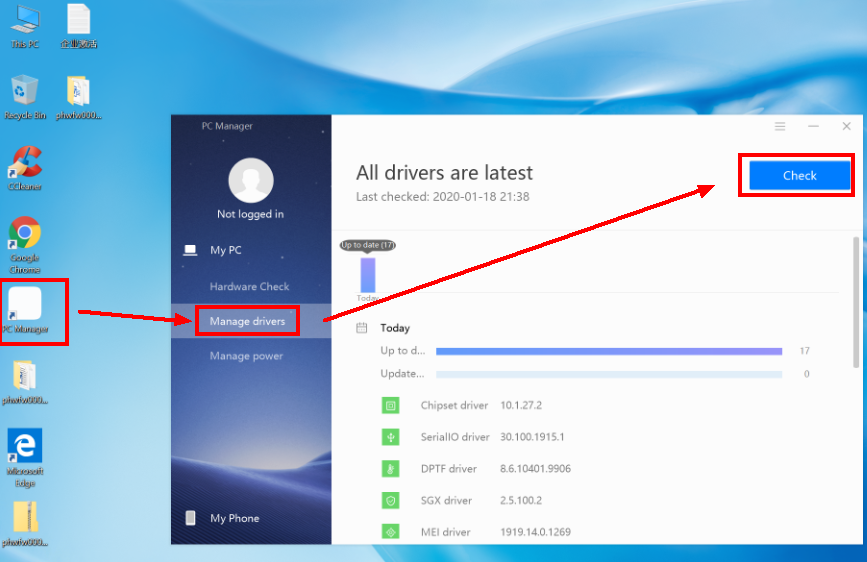
(2) Install the latest version of the driver in PC Manager.
Restart your computer, connect your computer to the network (either wired or wireless), open PC Manager, click Manage drivers > Check, select Wi-Fi driver, then update it immediately. After the update, restart your computer.
Scenario 4: There is a yellow exclamation mark displayed on the Wi-Fi icon 
FAQ 7: A yellow "!" icon is displayed on the Wi-Fi icon.
Cause: The user finds that there is a yellow exclamation mark displayed on the Wi-Fi icon which indicates that the computer is not connected to the network or the network is not available.
Solution: Try connecting other devices to this hotspot and check whether other devices can connect to the network.
(1) If other devices can connect to the network, perform the following to troubleshoot:
Run the cmd.exe as an administrator and run the ipconfig /all command to view information about the current network adapter.

Check whether the DHCP has been enabled. If not, it indicates that you have not set IP address and DNS settings to obtain the address automatically. To resove this issue, enable Obtain an IP address automatically.
If DHCP Address is displayed as Yes, check whether the IP address and the DNS server address are listed. If not, disconnect the Internet connection or disable Wi-Fi then obtain the IP address again. If the issue still persists, restart the router and try again.
If the issue still cannot be resolved, modify the IP address to the fixed one. Ensure that the IP address has the same network segment as the hotspot. For example, if the LAN network segment is "192.168.1.1" (to obtain the network segment, check the IP address of other devices), then set the IP address to "192.168.1.XX" (XX is any number between "0" and "255"). You do not need to configure the DNS.
Click the Wi-Fi icon and then go to Network & Internet settings > Network and Sharing Center > Change adapter settings. Right-click Wi-Fi, select Properties, click Internet Protocol Version 4 (TCP/IPv4), and select Obtain an IP address automatically and Obtain DNS server address automatically.


(2) If other devices are also unable to connect to the Internet via Wi-Fi, restart the Wi-Fi router, and contact your Internet service provider for assistance.
Scenario 5: There is no network icon
FAQ 8: There is no network icon in the bottom-right corner on the computer and there is also no Wi-Fi icon.
Cause: This is because the registry list that is related to the network has been deleted or modified, resulting in the Wi-Fi icon disappearing.
Solution:
Check that you are not using a campus network or NetKeeper.
If you are not using a campus network or NetKeeper, connect your computer to a wired network or use a USB shared network, and check whether your computer can connect to the network.
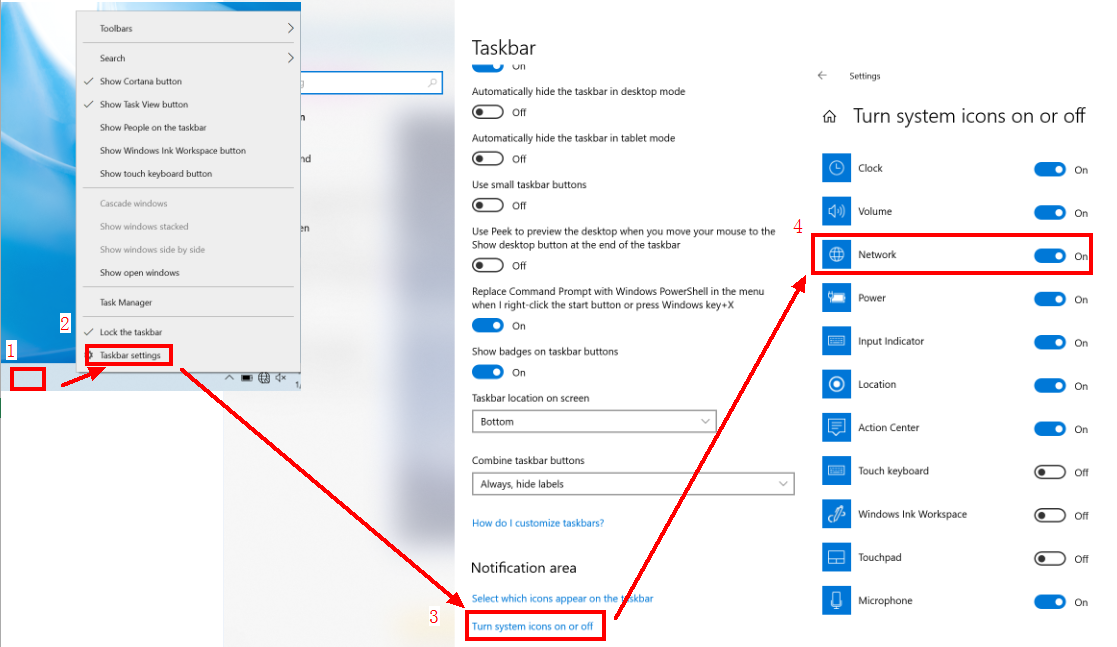
Right-click the taskbar and select Taskbar settings.
Select Turn system icons on or off.
Check whether you have enabled Network.
If you have enabled Network and still cannot find the Wi-Fi icon, unplug the charger from the computer, press and hold the power button for 10 seconds, then disable and enable the Wi-Fi driver again. If the issue persists, right-click the Windows icon, go to Device Manager > Network adapters, right-click Intel(R) Wireless-AC 9560, and select Disable device. Then right-click Intel(R) Wireless-AC 9560 and click Enable device.
If the issue persists, back up important data, restart your computer, and press F10 to restore your computer to its factory settings. If it still isn't resolved, back up your data and bring your device and proof of purchase to an authorized Honor Customer Service Center for assistance.